
 Bookmark this on Delicious
 Recommend to StumbleUpon
At the bottom is a link to a site where an Arduino is waiting to tell you the humidity and temperature, indoors and out, at an address in southern Connecticut, USA.
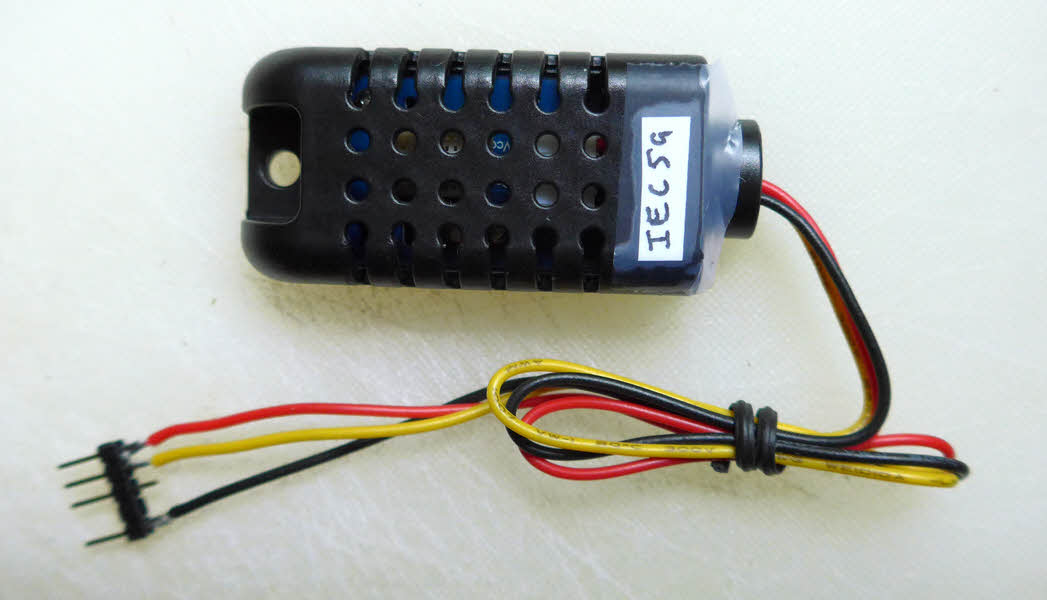
The illustration is of an RHT02... a functional equivalent of the more frequently discussed DHT22. Everything here was tested with that, not a "real" DHT22. If you find differences, I would be interested to learn about them. Contact details in footer.
This page shows you how to use a DHT22 humidity/ temperature sensor with a NoviceGuard and the NovGrdCore library. If you don't have a NoviceGuard or NovGrdCore, but still want to use DHT22 with an Arduino, Teensy, etc, fear not... you'd only have to make tiny changes. Want to use a DHT11, 21, 33 or 44? The library provides for those too. I haven't tried one of the other sensors, but doubt that the changes to use one are complex.
Some sources suggest that you ought to put a 10k pull-up resistor on the data line. I have used the RHT02 without a pull up, but only for short tests, and only with short leads. ("Pull-up resistor": Connect one end to the data line, one to the +ve voltage you are using to power the device, which, at least for beginners, ought to be the same as the Arduino's voltage. 5v or 3v3.)
N.B. At least in the DHTxx versions, you should not interrogate the sensor too frequently. This may also apply to the RHTxx sensors. For DHT11, "too often" is more than once per second, for DHT22, "too often is more than once per two seconds... but not that the DHT22 wider and more accurate ranges/ readings. How much can temperature or humidity change in two seconds, after all?!
(Besides NovGrdCore... and see "Convert for no NoviceGuard/ NovGrdCore", below, if you don't have/ don't want those.)
(This assumes you are using Arduino Development Environment vers 1.0 or higher. All will probably work in older environment, but why haven't you upgraded? Serious... I would like to know! Contact me, please?)
Details about the library at http://playground.arduino.cc/Main/DHTLib
I used the "Download latest version from GitHub" there on 7 Aug 15. That gave me a "library of libraries"... in a zip. From the zip, I installed just DHTlib, vers 0.1.20.
If for some reason you don't like the library suggested, the first time I set up a DHT22 on my machine, I used the Adafruit DHT library, explained at AdaFruit's tutorial on the DHT series sensors. It worked well in brief tests.
Standard NoviceGuard, but with "bypass LED" link open on LL output channel. (It MAY work without opening the link. I KNOW it works with the link open. If not using a NoviceGuard, you don't need to think about this "bypass LED" bit.) DHT22's data line plugged into the LL output channel, to use the code EXACTLY as written. Change the last two characters of the....
#define DHT22_PIN ouPLL
... line to use a different output daughter board socket, or just use a number for one if the i/o pins if not using NovGrdCore.
People not using a NoviceGuard can ignore this paragraph!... If you are thinking, you will be wondering "Why is an INPUT device being connected via an OUTPUT daughter board socket?" There are two answers to that. Go with "Just Do It", if you are a novice, just getting started. Or read "Why output sockets are sometimes used for input devices", if you have made a good start with the Arduino and NoviceGuard, and are ready for some details.
By the way: A detail: I didn't bother with the pull up resistor suggested by the people at Adafruit. But my tests were only brief. It might be a good idea. Not sure. (NovGrdCore "connects" the internal pull up on the input. If not using the NovGrdCore library... which you can use without a NoviceGuard, then put in a pinMode({pin},INPUT_PULLUP command in your setup() subroutine.)
1) Take a readings every 2 seconds from a DHT22 temperature humidity sensor.
2) Put the readings in variables.
3) Display the readings on the serial monitor.
Because the readings are put in variables within the demo, all that you need is more skills to send the readings elsewhere... to a VGA display attached to the Arduino with a Hobbytronics Serial to VGA adapter, to a data file, to the web via an ArduServer, etc, etc.
(I found, 2 out of 2 times, that there was a "connect error" the FIRST time my Arduino program went through its "loop()" code, but not after that. The code supplied makes various checks, has a sensible error code system. It "moves on" graciously, if the sensor fails to return a good value. Make your code robust. Make it USE those error codes. The DHT22 is a nice little device, but don't assume it will give good results EVERY time it is asked for them.)
The simple version is as follows. (Down to image. version with frill follows.)
//"DHT22_demo_minus_frill-2015Aug" for NoviceGuard + NovGrdCore...
//Vers 7 Aug 15

//Much of what is here courtesy of example...
//  FILE: dht22_test.ino
//  AUTHOR: Rob Tillaart
//  VERSION: 0.1.03
//... included with his DHT library.
//By all means have a look at that for many
//  additional useful ideas and examples.

//This is a BARE BONES test, just to make sure
//   your hardware is set up properly

//It is as you would run it using the NovGrdCore
//   library... but is easily tweaked to eliminate
//   the NovGrdCore aspects. It is as you would
//   run it with a NoviceGuard, but you don't need
//   one.
//See http://sheepdogguides.com/arduino/NoNovGrdCore.htm

//A nicely implemented frill was present in
//   Rob Tillaart's original. Once you have the
//   following working, I hope you will try
//   the fancier version, too. Also available
//   from...
//http://rugguino.com/DauBrds/DHT22.htm

#include <NovGrdCore.h>//no ; after a #include.
#include <dht.h> //Probably best if this #include
//   is AFTER the NovGrdCore include.

NovGrdCore NGC;
dht DHT;

#define DHT22_PIN ouPLL//No ; after #define.
//If using this without NovGrdCore, it equates to...
//#define DHT22_PIN 5
//Yes... we are putting an INPUT device on a
//  NoviceGuard OUTPUT daughterboard socket.
//See: http://rugguino.com/DauBrds/InpAndOutp.htm

void setup()
{
//Set things up so readings from DHT22 can be
//  seen on standard, provided- with- Arduino-
//  development- environment "serial monitor."
//For more on that:
//http://sheepdogguides.com/arduino/aht1serimoni.htm
    Serial.begin(9600);
    //And put a heading on the work
    Serial.print("DHT LIBRARY VERSION: ");
    Serial.println(DHT_LIB_VERSION);
    Serial.println();
    Serial.println("Type,\tstatus,\tHumidity (%),\tTemperature (C)\tTime (us)");
}//end of setup()

void loop()
{
    // READ DATA
    Serial.print("DHT22, \t");

    uint32_t start = micros();
    int chk = DHT.read22(DHT22_PIN);
    uint32_t stop = micros();

    switch (chk)
    {
    case DHTLIB_OK:
        Serial.print("OK,\t");
        break;
    case DHTLIB_ERROR_CHECKSUM:
        Serial.print("Checksum error,\t");
        break;
    case DHTLIB_ERROR_TIMEOUT:
        Serial.print("Time out error,\t");
        break;
    case DHTLIB_ERROR_CONNECT:
        Serial.print("Connect error,\t");
        break;
    case DHTLIB_ERROR_ACK_L:
        Serial.print("Ack Low error,\t");
        break;
    case DHTLIB_ERROR_ACK_H:
        Serial.print("Ack High error,\t");
        break;
    default:
        Serial.print("Unknown error,\t");
        break;
    }
    // DISPLAY DATA
    Serial.print(DHT.humidity, 1);
    Serial.print(",\t");
    Serial.print(DHT.temperature, 1);
    Serial.print(",\t");
    Serial.print(stop - start);
    Serial.println();

  delay(2000);
}//End of loop()
(Time for a break from all this soul-less geek-dom. The Arno, looking upstream from Florence.)
Above the image... the basic version of the code to demonstrate the lovely DHT22. Below here, the version with the nice frill. Well worth using. I only created the frill-less version above, to give you the "core", minus "distractions". The frill counts and reports the occurrence of various events. (Thank you Rob Tillaart for giving the example of that code-clarifying data structure!)
//"DHT22_demo_with_frill-2015Aug" for NoviceGuard + NovGrdCore...
//Vers 7 Aug 15

//Much of what is here courtesy of example...
//  FILE: dht22_test.ino
//  AUTHOR: Rob Tillaart
//  VERSION: 0.1.03
//... included with his DHT library.
//By all means have a look at that for many
//  additional useful ideas and examples.

//This is a BARE BONES test, just to make sure
//   your hardware is set up properly

//It is as you would run it using the NovGrdCore
//   library... but is easily tweaked to eliminate
//   the NovGrdCore aspects. It is as you would
//   run it with a NoviceGuard, but you don't need
//   one.
//See http://sheepdogguides.com/arduino/NoNovGrdCore.htm


#include <NovGrdCore.h>//no ; after a #include.
#include <dht.h> //Probably best if this #include
//   is AFTER the NovGrdCore include.

NovGrdCore NGC;
dht DHT;

#define DHT22_PIN ouPLL//No ; after #define.
//If using this without NovGrdCore, it equates to...
//#define DHT22_PIN 5
//Yes... we are putting an INPUT device on a
//  NoviceGuard OUTPUT daughterboard socket.
//See: http://rugguino.com/DauBrds/InpAndOutp.htm

//This next block imported from a DHTlib example,
//by Rob Tillaart
//It paves the way for the "frill" in this version
//  of the DHT22 test program... it creates a bunch
//  of "variables", where counts of how often certain
//  things have happened can be stored. And at the
//  end of the block, the initial count for each
//  is set to zero. "stuct" is a special word to the
//  Arduino compiler. A powerful word, but one you
//  can live without until you are ready to take on
//  extras. "stat" is just short for statistics, and
//  is the name Rob Tillaart chose to use as where
//  he would store his count of total, how many "ok"s,
//  crc_error, etc, events
struct
{
    uint32_t total;
    uint32_t ok;
    uint32_t crc_error;
    uint32_t time_out;
    uint32_t connect;
    uint32_t ack_l;
    uint32_t ack_h;
    uint32_t unknown;
} stat = { 0,0,0,0,0,0,0,0};
//end of block imported from demo by Rob Tillaart

void setup()
{
//Set things up so readings from DHT22 can be
//  seen on standard, provided- with- Arduino-
//  development- environment "serial monitor."
//For more on that:
//http://sheepdogguides.com/arduino/aht1serimoni.htm
    Serial.begin(9600);
    //And put a heading on the work
    Serial.print("DHT LIBRARY VERSION: ");
    Serial.println(DHT_LIB_VERSION);
    Serial.println();
    Serial.println("Type,\tstatus,\tHumidity (%),\tTemperature (C)\tTime (us)");
}//end of setup()

void loop()
{
    // READ DATA
    Serial.print("DHT22, \t");

    uint32_t start = micros();
    int chk = DHT.read22(DHT22_PIN);
    uint32_t stop = micros();

    stat.total++;//The "stat.XXX" lines are GOOD
      //PROGRAMMING... but not "core" to the
      //operation of the DHT22. They are "just"
      //keeping track of how often various things
      //happen.

    switch (chk)
    {
    case DHTLIB_OK:
        stat.ok++;//Lines like this are part of the frill
        Serial.print("OK,\t");
        break;
    case DHTLIB_ERROR_CHECKSUM:
        stat.crc_error++;
        Serial.print("Checksum error,\t");
        break;
    case DHTLIB_ERROR_TIMEOUT:
        stat.time_out++;
        Serial.print("Time out error,\t");
        break;
    case DHTLIB_ERROR_CONNECT:
        stat.connect++;
        Serial.print("Connect error,\t");
        break;
    case DHTLIB_ERROR_ACK_L:
        stat.ack_l++;
        Serial.print("Ack Low error,\t");
        break;
    case DHTLIB_ERROR_ACK_H:
        stat.ack_h++;
        Serial.print("Ack High error,\t");
        break;
    default:
        stat.unknown++;
        Serial.print("Unknown error,\t");
        break;
    }
    // DISPLAY DATA
    Serial.print(DHT.humidity, 1);
    Serial.print(",\t");
    Serial.print(DHT.temperature, 1);
    Serial.print(",\t");
    Serial.print(stop - start);
    Serial.println();

//This next bit is the "core" to the frill which reports
//   how often various things have happened.
//(Down to "End of 'not core'")

    if (stat.total % 20 == 0)//Provide the report once in a while
    {
        Serial.println("\nTOT\tOK\tCRC\tTO\tUNK");
        Serial.print(stat.total);
        Serial.print("\t");
        Serial.print(stat.ok);
        Serial.print("\t");
        Serial.print(stat.crc_error);
        Serial.print("\t");
        Serial.print(stat.time_out);
        Serial.print("\t");
        Serial.print(stat.connect);
        Serial.print("\t");
        Serial.print(stat.ack_l);
        Serial.print("\t");
        Serial.print(stat.ack_h);
        Serial.print("\t");
        Serial.print(stat.unknown);
        Serial.println("\n");
//This is the end of the significant block which
//  provides the frill.

    }
    delay(2000);
}//End of loop()
That's it! That's how you use a DHT22. The library can also read DHT11s, 21s, 33s, 44s and there are functional equivalents of the DHT11 and DHT22 from Modern Device, under different designations, e.g. the RHT02.
One final point... do not under-estimate the energy of our arthropod friends. If mounting in a house, the casing may be sufficient. If mounting outside, the casing is just a start to protecting the insides from spider webs and insect egg laying, etc. You will have to devise an enclosure to keep the beasties OUT, while letting the current humidity and temperature levels IN. Complex temperature sensors always suffer from a tendency to detect a bit of heat from the board's electrical activity in addition to the true ambient temperature. (Do try to keep "heat" and "temperature" distinct in your mind. Have I used "heat" properly here, I ask myself...)
Here are more things from the library's documentation...BEGIN QUOTE:
The DHT11, 21, 22, 33 and 44 are relative inexpensive sensors for measuring temperature and humidity.
This library can be used for reading both values from these DHT sensors. The DHT11 only returns integers (e.g. 20) and does not support negative values. The others are quite similar and provide one decimal digit (e.g. 20.2)
The hardware pins of the sensors and handshake are identical so ideal to combine in one lib.
The library (0.1.13 version) is said to work with:
UNO (tested myself)
2009
MEGA2560
DUE
attiny85 @8MHz
Digistump Digix @ 84 MHz
.... ENDQUOTE
Visit http://playground.arduino.cc/Main/DHTLib for more information on this library. When you get there, you may think it is a content-less template... just scroll down a little bit to get to The Good Stuff.
With a bit of luck, you can check the humidity and temperature, indoors and out, at an address in southern Connecticut, USA. (That page will open in a new window or tab. Just close it to get back here.
The "gibberish" at the upper left is a machine-friendly version of the data, provides for direct, no- human- needed monitoring of the site.
The site is sometimes down, don't be alarmed if you can't connect. But when it is working, it is driven by a cheap ($9) Wiz5100 board and a Sparkfun Arduino Pro ($14), and two Sparkfun RHT02s.
![]() Page has been tested for compliance with INDUSTRY (not MS-only) standards, using the free, publicly accessible validator at validator.w3.org. Mostly passes, just a few "No attribute" issues, arising from Google code.
Page has been tested for compliance with INDUSTRY (not MS-only) standards, using the free, publicly accessible validator at validator.w3.org. Mostly passes, just a few "No attribute" issues, arising from Google code.
....... P a g e . . . E n d s .....