Click this for NoviceGuard main page
This page will introduce you to a daughter board for NoviceGuard. You do not need a NoviceGuard to use what is presented here. It will be of little use if you do not have an Arduino.
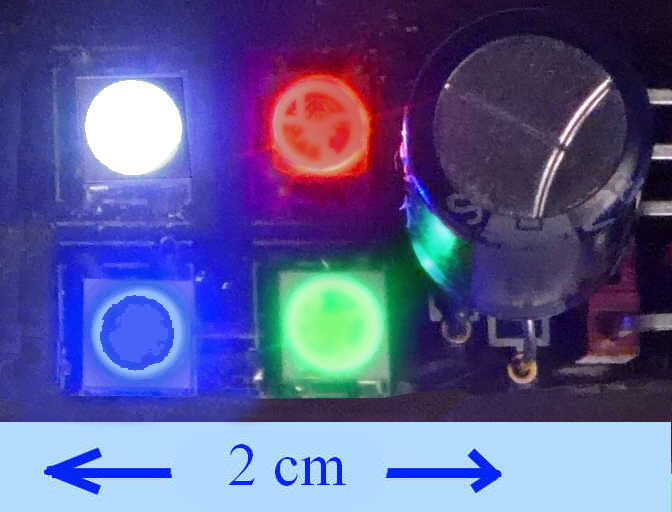
This is an approximation of what my daughter board for NoviceGuard, with WS2812 SmartLEDs looked like. The colors... especially the bright "LED" blue at the lower left... are MUCH prettier in the real world.
See it in action in a 40 second YouTube clip of the NoviceGuard/ DS2812/ SmartLEDs demonstrator... which doesn't do the vivid colors justice!
The daughter board lets you plug WS2812 SmartLEDs into an Arduino. SmartLEDs are really cool, worth the very small nuisances involved in getting started...a power supply, a capacitor, a resistor, and some SmartLEDs, and you are Good To Go. A SmartLED is a small (5mm on a side) module with a red, a green and a blue LED... very BRIGHT! LED... and some control circuits. With just one output line from something like an Arduino, you can set each of those LEDs to any brightness from 0-255. From more than 10cm away, the three LEDs blend into a single point of color... any one of 16 million colors.
Red and yellow and green and brown and scarlet and black and ochre and peach and ruby and olive and violet and fawn And lilac and gold and chocolate and mauve and cream and crimson and silver and rose.... if Tim Rice will forgive me using his line.
This is a daughther board for the NG_PwrDemand_2 power scenario.
You need some SmartLEDs. I'd buy these connected up for you, if I were you. The small board you'll see in the video is for "proof of concept. It works. But is fiddly to assemble. But if you REALLY want to go that route, get in touch. (Eddress at bottom of page.) You'll find details of a nice SmartLED array to begin with, and some more technical details, at a page I did about SmartLEDs in general. The page you are reading here is about marrying SmartLEDs to an Arduino across a NoviceGuard. The other page will also tell you about the essential (no, you can't leave them 'til later) power supply, capacitor and resistor.
The daughter board (or your substitute) has three pins to go into one of the NoviceGuard's input daughter board positions. (All this is "taken care of" for you, when you use an actual daughter board, of course.)
You don't have to use a NoviceGuard to benefit from this page. The NoviceGuard just makes it easier for novices to hook things up. (We will be using four inputs... you don't "need" any, but with inputs, you can select different patterns for display on the SmartLEDs.) The inputs we need are on the NoviceGuard. I've done a separate page on doing NoviceGuard challenges/ programs without a NoviceGuard. (You just have to provide.. not hard... your users with the things NoviceGuard would give them. For this exercise, four buttons (or fewer, if you don't mind losing functionality) to press that the Arduino can "see" being pressed.
A library is provided for NoviceGuard users: "NovGrdCore".
You don't have to use the library to benefit from this page. There's more on Do I need the NovGrdCore Library in the page I wrote about that. For this exercise, you just have to provide, by other means...
#define ouPLL 5
... if you want to plug the daughter board (or equivalent) into the daughter board socket I was using, the one connected to digital pin 5 of the Arduino.
And, for the "fancy" version of the SmartLED daughter board demonstrator, if you haven't bothered with the NovGrdCore library, you have to provide the following subroutines...
boInHigh(x), where X can be 0,1,2 or 3: Returns "true" or "false", depending on whether a button is pressed. It reads one of four buttons, which one depending on the value you have in x.
makeOuUL(x), where X can be 0 or 1: Makes the Upper Left output high or low, depending on the value you have in x... and some similar routines for UR and LL.
You WILL need the Adafruit_NeoPixel library to use the software below. Obtaining and installing that, if you need help (it isn't hard) is contained within the page I already cited about using WS2812 SmartLEDs.
Assuming you are using a NoviceGuard board and the NovGrdCore library, all you need to turn four LEDs "on", one white, one red, one blue, one green (and not too bright!) is...
The following shows you all "the stuff" you need to get the thing working. Well. Showing a static display of four SmartLEDs, one set to white, one to red, one to blue and one to green.
/*SmartLEDs-15426-Simplest...
#include <NovGrdCore.h>
#include <Adafruit_NeoPixel.h>
#define bLedSmartLEDStripPin ouPLL//no ; here

Adafruit_NeoPixel SmartLEDStrip=
         Adafruit_NeoPixel(4,
         bLedSmartLEDStripPin,
         NEO_GRB + NEO_KHZ800);
//====================================
void setup()
//For Adafruit_Neopixel's needs...
{
SmartLEDStrip.begin();
SmartLEDStrip.show(); // Initialize all pixels to 'off'
}//end of setup()

//================================================
void loop()
{
  SmartLEDStrip.setPixelColor(0,SmartLEDStrip.Color(32,32,32));
  SmartLEDStrip.setPixelColor(1,SmartLEDStrip.Color(32,0,0));
  SmartLEDStrip.setPixelColor(2,SmartLEDStrip.Color(0,32,0));
  SmartLEDStrip.setPixelColor(3,SmartLEDStrip.Color(0,0,32));
  SmartLEDStrip.show();
}//end of loop()
That's it. Everything you need to generate the display shown in the photo at the top of the page.
There are various "setup" bits. Then the four SmartLEDStrip.setPixelColor... lines, one for each SmartLED.
But the LEDs don't show those colors until the...
SmartLEDStrip.show();
... line executes.
Simple!
The setPixelColor() commands updates an entry in a buffer in the Arduino's memory; the SmartLEDStrip.show() command sends... exceedingly quickly... a "long" message to the array of smart LEDs. A message boiling down to "LED0, you should be..., LED1, you should be...., etc" (One "you should be" for each smart LED)". (The buffer is set up for you by the SmartLEDStrip.begin()).
The following doesn't do anything "clever" with turning the SmartLEDs on and off, or setting their color or brightness.
The whole program is "just" some SmartLEDStrip.setPixelColor... lines, with amartLEDStrip.show(); thrown in from time to time.
The "cleverness" (such that it is) in this is in the control structures allowing a user to "tell" the Arduino which of several available dynamic patterns should be presented.
The program also uses the basic Arduino loop (and some variables) to step through many stages in three of the four "do this" choices. (Pressing the Upper Left button tells the Arduino just to display a steady mid-bright white, red, blue and green.)
/*SmartLEDs-15426

Filename: The "15426" is for 26 Apr 2015, to disambiguate

This is a simple demo for four WS2812 smart LEDs plugged
into input "LL" (lower left) of a NoviceGuard (You make
ONE change in the following to use a different output,
ONE other change to use a different number of WS2812s

WS2812: http://www.arunet.co.uk/tkboyd/ec/WS2812SmartLEDs.htm
NoviceGuard: http://rugguino.com/Modules.htm

=========================================================
YOU MUST USE EXTERNAL POWER FOR THE DAUGHTER BOARDS
WITH THIS HARDWARE CONFIGURATION.

***Be sure*** J1 is linked to the UPPER "Ex" pin for this
=========================================================

Vers: 26 Apr 15
Started 26 Apr 15

Simple demo/test program for WS2812s on an Arduino
via a NoviceGuard... see...
   http://rugguino.com/Modules.htm

---------------------------------------
(Nothing to do with the WS2812s... )
As usual, the NoviceGuard needs two 10k
(or thereabouts) resistors pulling inputs
inPUR and inPLR high. These may be soldered
to the board, or supplied via restores on
pins, working like a "daughter board".*/

//=================================================
//For NoviceGuard, but not "required" if you do some
//#defines by hand and provide some simple subroutines
#include <NovGrdCore.h>

//For Adafruit_NeoPixel's needs...
#include <Adafruit_NeoPixel.h>
#define bLedSmartLEDStripPin ouPLL//no ; here

Adafruit_NeoPixel SmartLEDStrip=
         Adafruit_NeoPixel(4,
         bLedSmartLEDStripPin,
         NEO_GRB + NEO_KHZ800);
/*================================================
N.B.: In the following creation of an instance of
  the NovGrdCore object, use whatever name you
  like where I have NGC, but is there any reason
  to use anything else? Remember: if you change
  it here, you must also change it in the other
  places it appears.*/
NovGrdCore NGC;

//For this program, not of broader implication...
byte bPattSel;//Pattern select... based on input
       //buttons pressed.
byte bRed;
byte bGreen;
byte bBlue;
word wCycle;
word wCycleSlow;
byte bTmp;
//==============================================
void setup()
/*Various pinMode statement are executed when you
  create the NovGrdCore object (NGC).
REMEMBER, PLEASE: Do not put any pinMode
  statements into your programs while you are
  still using the NoviceGuard, unless you are
  sure, sure, SURE you've been given special
  permission for some reason.*/
{
//Init various variables...
bPattSel=0;
bRed=0;
bBlue=0;
bGreen=0;
wCycle=0;
wCycleSlow=0;

//For Adafruit_Neopixel's needs...
SmartLEDStrip.begin();
SmartLEDStrip.show(); // Initialize all pixels to 'off'

//Optional check on your NovGrdCore library version
//It will appear on serial monitor.
//http://sheepdogguides.com/arduino/aht1serimoni.htm
Serial.begin(9600);
Serial.print("Compiled using version ");
NGC.reportVers();
Serial.println();
Serial.println("of the NovGrdCore library");
}//end of setup()

//================================================
void loop()
{
if (NGC.boInHigh(0))
     {NGC.makeOuUL(0);}//no ; here
    else
     {NGC.makeOuUL(1);
      bPattSel=0;}//end of else

if (NGC.boInHigh(1))
     {NGC.makeOuUR(0);}//no ; here
    else
     {NGC.makeOuUR(1);
      bPattSel=1;}//end of else

if (NGC.boInHigh(2))
//Don't use ouPLL ("2").... it has the
//  SmartLED array on it.
{}//no ; here
    else
     {bPattSel=2;}//end of else

//The "same" thing, again, to illustrate
//  a more elegant, (but more obscure) way...
if (NGC.boInHigh(3))
  {NGC.makeOu(3,0);}//no ; here
 else
  {NGC.makeOu(3,1);
      bPattSel=3;};//end of else


/*SmartLED specific code...
The Case 0 display is the easiest to understand. It is always
"only" a matter of doing some...
SmartLEDStrip.setPixelColor(CHAN,SmartLEDStrip.Color(RRR,GGG,BBB));
statements, and then a SmartLEDStrip.show();
In the setPixelColor statement, replace CHAN with 0,1,2 or 3 to
select the SmartLED you want. (O:UL, then numbered clockwise around
the square. NOT numbered as other things on NoviceGuard)
The RRR,BBB,GGGs to be replaced by numbers, 0-255

There's nothing particularly brilliant about any of these...
YOU should be able to come up with much more interesting,
and pretty, effects from the Smart LEDs.*/

switch (bPattSel){
case 0:
  SmartLEDStrip.setPixelColor(0,SmartLEDStrip.Color(32,32,32));
  SmartLEDStrip.setPixelColor(1,SmartLEDStrip.Color(32,0,0));
  SmartLEDStrip.setPixelColor(2,SmartLEDStrip.Color(0,32,0));
  SmartLEDStrip.setPixelColor(3,SmartLEDStrip.Color(0,0,32));
  SmartLEDStrip.show();
 break;//End of case 0

 case 1:
  if ((wCycle%48)==0) {wCycleSlow++;};
  if (wCycleSlow==65534){wCycleSlow=0;}
  bTmp=wCycleSlow%256;
  SmartLEDStrip.setPixelColor(0,SmartLEDStrip.Color(0,bTmp,0));
  SmartLEDStrip.setPixelColor(1,SmartLEDStrip.Color(bTmp,255-bTmp,0));
  SmartLEDStrip.setPixelColor(2,SmartLEDStrip.Color(0,255-bTmp,0));
  SmartLEDStrip.setPixelColor(3,SmartLEDStrip.Color(255-bTmp,0,bTmp));
  SmartLEDStrip.show();
 break;//End of case 1

case 2:
  if ((wCycle%64)==0) {wCycleSlow++;};
  if (wCycleSlow==65534){wCycleSlow=0;}
  if((wCycleSlow%4)==0){
  SmartLEDStrip.setPixelColor(0,SmartLEDStrip.Color(0,0,48));
  SmartLEDStrip.setPixelColor(1,SmartLEDStrip.Color(0,0,24));
  SmartLEDStrip.setPixelColor(2,SmartLEDStrip.Color(0,0,4));
  SmartLEDStrip.setPixelColor(3,SmartLEDStrip.Color(0,0,1));
  SmartLEDStrip.show();}
  if((wCycleSlow%4)==1){
  SmartLEDStrip.setPixelColor(0,SmartLEDStrip.Color(0,0,24));
  SmartLEDStrip.setPixelColor(1,SmartLEDStrip.Color(0,0,4));
  SmartLEDStrip.setPixelColor(2,SmartLEDStrip.Color(0,0,1));
  SmartLEDStrip.setPixelColor(3,SmartLEDStrip.Color(0,0,48));
  SmartLEDStrip.show();}
  if((wCycleSlow%4)==2){
  SmartLEDStrip.setPixelColor(0,SmartLEDStrip.Color(0,0,4));
  SmartLEDStrip.setPixelColor(1,SmartLEDStrip.Color(0,0,1));
  SmartLEDStrip.setPixelColor(2,SmartLEDStrip.Color(0,0,48));
  SmartLEDStrip.setPixelColor(3,SmartLEDStrip.Color(0,0,24));
  SmartLEDStrip.show();}
  if((wCycleSlow%4)==3){
  SmartLEDStrip.setPixelColor(0,SmartLEDStrip.Color(0,0,1));
  SmartLEDStrip.setPixelColor(1,SmartLEDStrip.Color(0,0,48));
  SmartLEDStrip.setPixelColor(2,SmartLEDStrip.Color(0,0,24));
  SmartLEDStrip.setPixelColor(3,SmartLEDStrip.Color(0,0,4));
  SmartLEDStrip.show();
  }
  delay(1);
 break;//End of case 2

 case 3:
  if ((wCycle%768)==0) {wCycleSlow++;};
  if (wCycleSlow==65534){wCycleSlow=0;}
  if((wCycleSlow%2)==0){
  SmartLEDStrip.setPixelColor(0,SmartLEDStrip.Color(128,128,0));
  SmartLEDStrip.setPixelColor(1,SmartLEDStrip.Color(128,0,0));
  SmartLEDStrip.setPixelColor(2,SmartLEDStrip.Color(128,128,0));
  SmartLEDStrip.setPixelColor(3,SmartLEDStrip.Color(128,0,0));
  SmartLEDStrip.show();}
  if((wCycleSlow%2)==1){
  SmartLEDStrip.setPixelColor(0,SmartLEDStrip.Color(128,0,0));
  SmartLEDStrip.setPixelColor(1,SmartLEDStrip.Color(128,128,0));
  SmartLEDStrip.setPixelColor(2,SmartLEDStrip.Color(128,0,0));
  SmartLEDStrip.setPixelColor(3,SmartLEDStrip.Color(128,128,0));
  SmartLEDStrip.show();}
 //End of case 3

};//end of switch/case
wCycle++;
if (wCycle>65534) {wCycle=0;};
}//end of loop()
That's it. I hope it fanned your interest in NoviceGuard, or the SmartLEDs, or both!
![]() Page has been tested for compliance with INDUSTRY (not MS-only) standards, using the free, publicly accessible validator at validator.w3.org. Mostly passes, just a few "No attribute" issues, arising from Google code.
Page has been tested for compliance with INDUSTRY (not MS-only) standards, using the free, publicly accessible validator at validator.w3.org. Mostly passes, just a few "No attribute" issues, arising from Google code.
....... P a g e . . . E n d s .....