Click this for NoviceGuard main page
The NoviceGuard PCB, with its small assortment of switches, LEDs, resistors, is there to make life easy for novices, and to protect Arduinos from novices' mistakes.
You do not need a NoviceGuard to use the examples and challenges on the web designed to help people who do happen to have one. You do not need to use an Arduino Pro Mini. All you need, to play happily in the fields of the NoviceGuard material is....
You won't have the conveniences and protections NoviceGuard and NovGrdCore give you... but the NoviceGuard examples will "work".
The rest of this page is about the simple things you have to provide to your users, if you want to use the examples and challenges without having the hardware, a NoviceGuard. Not every project will require every one of the following bits of electronics, bits to duplicate what the NoviceGuard would provide. (Not every project uses all of the provisions of the NoviceGuard.)
Besides the hardware, the NoviceGuard, there is also software: an Arduino library, NovGrdCore, to make things easier for users. You do not need the library... but I would commend it highly to you if you want to use the NoviceGuard tutorials, projects, challenges... even if you are doing them without a NoviceGuard.
Whether you use a NoviceGuard board or not, to use the lesson/project ideas, you must also respect the NoviceGuard restrictions on the use of the pinMode command. There are two ways to do this... discussed in "NovGrdCore or Not", an essay discussing the pros and cons and alternatives to using the NoviceGuard library of core definitions and routines.
So... back to hardware choices. If you'd just use a NoviceGuard, all the following would be taken care of for you in a beginner-resistant form. But if you don't want to use a NoviceGuard board, here is what you have to provide by other means....
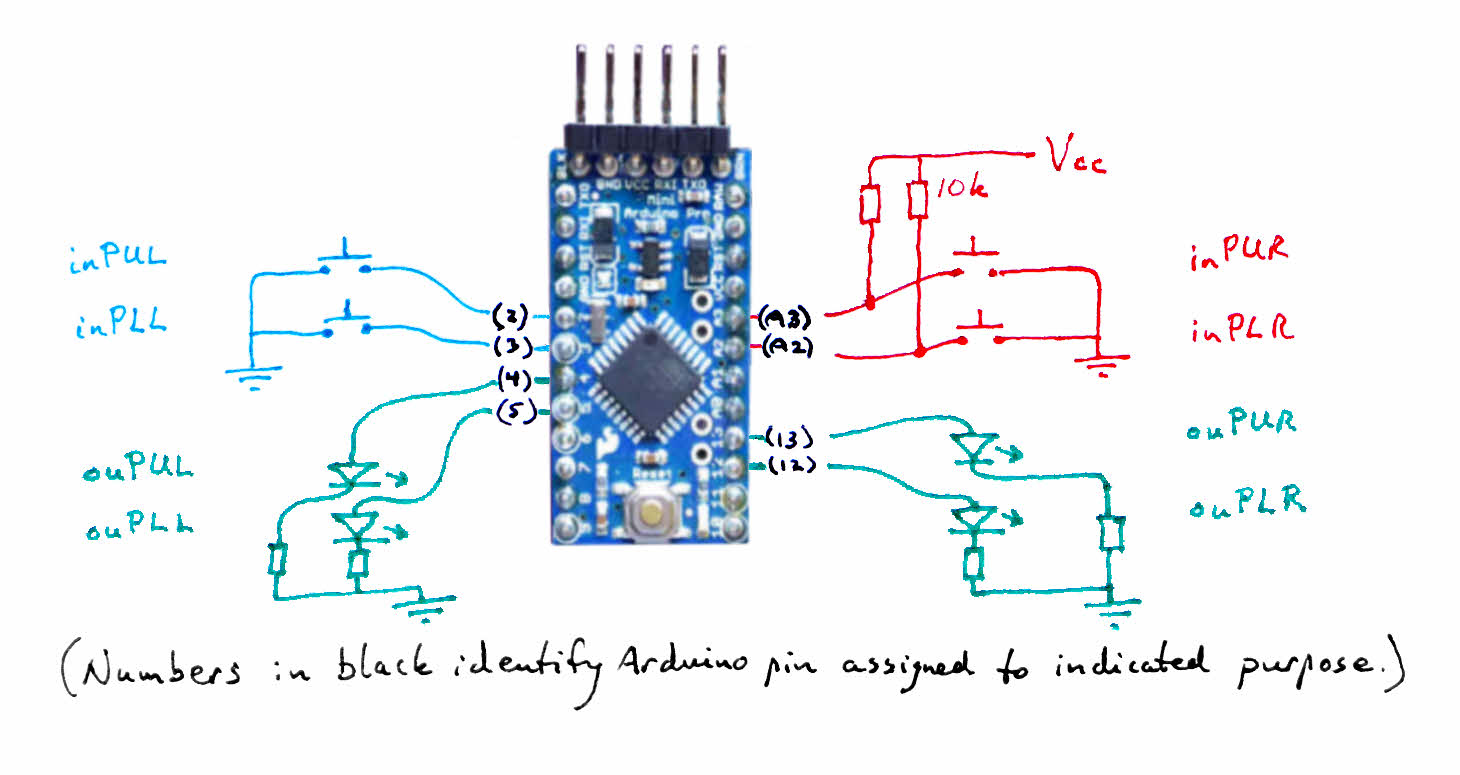
All you need to use the NoviceGuard with any teaching notes is an Arduino with, for the "Level Zero" stuff, four push-buttons (with pull up resistors on two... only two... of them), four LEDs (plus their resistors). As shown in diagram above.
Much of the teaching notes will be hard to follow if the switches and LEDs are not set out in two squares. One square for switches, one for LEDs.
In each square, the elements are referred to as UL, UR, LL, and LR. (For (Upper/Lower) (Left/Right)). They are sometimes referred to by a number, with UL being "0", UR being "1", LL being "2" and LR being "3". (The sequence is the one we use every day in reading text, not the more interesting boustrophedon sequence which made such a difference, so simply, to the speed of early personal computer printers when introduced. (Yes, I just wanted an excuse to use that splendid word.))
The LEDs will each connect to ground through a resistor. They need to be on Arduino digital lines 5, 13, 5 and 12 unless you want to mess with the #defines in NovGrdCore. Not a good idea, in several respects.
All four buttons are "SPSP", "NO" ("normally open")... like a doorbell's button.
Unless you want to mess with the #defines in NovGrdCore, still a Bad Idea, buttons 0 and 2 must, when pressed, connect Arduino digital lines 2 and 3 to ground. No other connections or components are required for the left hand inputs.
Buttons 1 and 3 must, as with buttons 0 and 2, when pressed, connect Arduino analog lines 3 and 2 to ground. However, additionally, each line must be pulled high with a 10k (or so) resistor. (I.e. connected through the resistor to your board's Vcc, be that 5v or 3v3.) (This pull up resistor is "extra", but easily provided, when you use an actual NoviceGuard.)
That much will give you a set up which allows you to do many NoviceGuard-intended projects, challenges, etc.
However, NoviceGuard provides for much more, too.
Most of the Arduino's other pins are available... with less protection than the pins discussed above... via the 12 way connector across the bottom of the NoviceGuard. My plans for that are well thought out... but documentation will be a while in coming. I would keep novices "out" of that connector, but there's no reason that experienced users should not make use of it.
All of the "basic" Arduino lines... the outputs on D4, D5, D12, and D13, and the four inputs... two digital, two analog (D2, D3, An2, An3) are available for the use of "daughter boards"... small modules plugged into the NoviceGuard via 5 way sockets provided around the edge of the NoviceGuard.
There is no reason why a NoviceGuard daughter board should not be used with a NoviceGuard-less Arduino. You will just have to be careful to connect the daughter board's ground pin (number 1, the bottom one, if you have a daughter board in front of you, with the pins facing to the right) to the Arduino's ground.
All daughter boards use either (only one or the other, in any specific daughter board) an input to the Arduino or an output from it. In the former case, the input will be fed via pin 3. In the latter case, output from the Arduino, the signal will arrive via pin 4.
The NoviceGuard daughter board socket can supply Vcc to the daughter board. Be careful. If you don't supply a separate Vcc, and plug in the wrong daughter boards, or two many of "the right" ones, you will demand too much of the Arduino. This is one way that it can be harmed, even when it has a NoviceGuard protecting it.
(More information on the subject is provided in the other pages on this site, as it applies whether you use a NoviceGuard board or not.)
Bottom line on the "power" question: Novice users will need good guidance from instructors or NoviceGuard usage notes on avoiding demanding too much power from the Arduino they are using.
I hope that helped you understand what NoviceGuard has to offer? Click here for the main page for NoviceGuard if you haven't already seen it (or if, as I hope, you want to go back to it!)
I have many other ideas and resources for you out of my main page, SheepdogSoftware.co.uk.
![]() Page has been tested for compliance with INDUSTRY (not MS-only) standards, using the free, publicly accessible validator at validator.w3.org. Mostly passes, just a few "No attribute" issues, arising from Google code.
Page has been tested for compliance with INDUSTRY (not MS-only) standards, using the free, publicly accessible validator at validator.w3.org. Mostly passes, just a few "No attribute" issues, arising from Google code.
....... P a g e . . . E n d s .....