Click this for NoviceGuard main page
Based on years of teaching, and earlier designs for similar projects, in early 2015, I developed NoviceGuard... a bit of hardware that makes things easier for newcomers to the delights of "playing" with Arduinos.
In addition to making it easier to use an Arduino, the NoviceGuard protects the Arduino, to some extent, from the errors novices sometimes make.
If you haven't already had a general introduction to the NoviceGuard, please visit the NoviceGuard project's main page.
Good! "Met" the NoviceGuard? Then we can go on to....
To make using NoviceGuard easier, there is a free library to extend the Arduino programming environment. It is called NovGrdCore. You can download the NovGrdCore files with the link in this sentence. Once unzipped the files are all just text files... you can look in them, check for malware. (They install in the usual way. There's help on this further down the page, but first why install them...)
We'll examine NovGrdCore comprehensively in due course. Just to give you an idea, here are two little program's for a NoviceGuard. They can be compiled if the computer with the IDE has NovGrdCore, the free library....
First: the traditional microprocessor "Blink", for NoviceGuard + NovGrdCore....
---------------------------------------
//TESTED code... should be EXACTLY RIGHT!
#include <NovGrdCore.h>;
NovGrdCore NGC;

void setup()
{
}

void loop()
{
  NGC.makeOuUL(0);
  delay(300);
  NGC.makeOuUL(1);
  delay(50);
}
---------------------------------------
And second: Here's an Arduino "doorbell" for a deaf person. An LED comes on when the button is pressed. Of course, the deaf person should be able to see the button presser if the deaf person can see the LED... but the button could be put on the end of a wire, and the LED replaced by a buzzer....
---------------------------------------
//TESTED code... should be EXACTLY RIGHT!
#include <NovGrdCore.h>;
NovGrdCore NGC;

void setup()
{
}

void loop()
{
  if (NGC.boInHigh(0))
  {NGC.makeOuUL(0);}
  else
  {NGC.makeOuUL(1);}
}
---------------------------------------
Those don't seem Really Simple?? They are, really! You need to have installed (no big deal) the free and open NovGrdCore library, if you want to run the programs exactly as above. (With minor tweaks, you can eschew NovGrdCore.)
The first two lines never change. You just use them as you see them.
NGC.makeOuUL(0); MAKES the OUtput line at the UpperLeft on the NoviceGuard low, turning off the LED on that line. The same word, but with a 1 makes the output high, and turns the NoviceGuard's LED on.
NGC.boInHigh(0) will return "true" or "false", hence the "bo", for "Boolean" at the start. It will be true if the Upper Right (that's the "0") button on the NoviceGuard is NOT pressed.
-------------
What's this "Should be exactly right" stuff??! Mea culpa, gentle reader... I fear that there may be bits and pieces of code still on the site with an extra semi-colon, or a missing "NGG.". If you come across any such wasters of readers' time, I would be grateful to hear from you... especially if you tell me what page the error is on.
If you accept my suggestion, and use NovGrdCore (which is what this page is about) then all you need in your program's loop() to test the 4 buttons and 4 LEDs on the basic NoviceGuard is....
if (NGC.boInHigh(0)) {NGC.makeOu(0,0);} else {NGC.makeOu(0,1);};
if (NGC.boInHigh(1)) {NGC.makeOu(1,0);} else {NGC.makeOu(1,1);};
if (NGC.boInHigh(2)) {NGC.makeOu(2,0);} else {NGC.makeOu(2,1);};
if (NGC.boInHigh(3)) {NGC.makeOu(3,0);} else {NGC.makeOu(3,1);};
The number passed with boInHigh tells the Arduino which button to look at. The first number with makeOu tells it which LED to set or clear, and the second number says which, on or off.
The process of installing the library is covered later.
You do not need to use the library.
You may be saying to yourself, "Why would I want the library?", or "I haven't used libraries much... I'm not sure I want to use this one."
If you are saying either, then you do have a choice. I've written a page for you about "Do I have to install and use the NovGrdCore library?"... but I would suggest to you that unless you (or anyone you are putting in front of a NoviceGuard equipped Arduino) are at least an intermediate user, you would find mastering "using libraries" very, very worthwhile. If you decide not to use the library, you have to do numerous things "the hard way". Later in this page, you will be given help with the details of installing, using the library.
The library takes care of doing the following #defines. Whether you choose to use the library or not, you will find having the #defines in your work will make following examples at this site a lot easier!
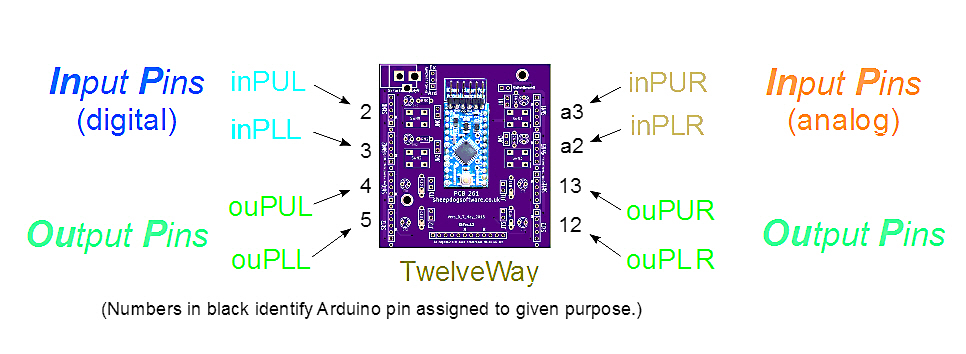
If you use the library, the #defines will have been done, and you don't have to (and shouldn't) worry about which actual pins the NoviceGuard is using for...
     #define inPUL 2 //no ; here
     #define inPUR 3 //no ; here ANALOG channel number
     #define inPLL 3 //no ; here
     #define inPLR 2 //no ; here ANALOG channel number
     #define ouPUL 4 //no ; here
     #define ouPUR 13 //no ; here
     #define ouPLL 5 //no ; here
     #define ouPLR 12 //no ; here
What did I mean when I said you shouldn't worry about which pins are in use?
I meant that when you want to refer to the pin connected to the input line connected to the button on the upper left of the NoviceGuard, you say "inPUL", instead of "2". (That input is done via pin 2... but you don't need to worry about the 2. You simply remember the (somewhat!) human friendly name for that pin, created by the #define, which "happens" as soon as you put #include NovGrdCore near the top of your code.
The names are made up as follows: "in" or "ou" for INput or OUtput. One of the restrictions of using NoviceGuard is that a given pin is always used for one or the other in every project.
"P" in every case for "Pin".
UL, UR, LL, LR: The pushbuttons connected to the inputs and the LEDs connected to the outputs are both arranged in a square. (Through the "daughter boards", other inputs and outputs can be used, but even they will be arranged more or less as the switches and LEDs.) UL is for Upper Left. UR: Upper Right. LL: Lower Left. LR: Lower Right.
(Numbers are sometimes used to specify an input or output. They are 0,1,2,3 for, respectively, UL, UR, LL, LR. In other words, the numbers are assigned in the order you would read four words written as a square.)
As the upper left input is always on D2, you could just use "2" instead of inPUL... but using a mnemonic is a good habit for the beginners to get used to. In later work, they may well put something together which draws on someone else's ideas, but allocates inputs and outputs to different pins than were used in the original.
One of the greatest weaknesses... and I don't consider it a very great weakness, especially if you use the NovGrdCore library, is that novices using the NoviceGuard must promise not to use any pinMode statements.
If you are using NoviceGuard with the NovGrdCore library, then the novices should never even see a pinMode statement. The following is taken care of for you as soon as you include....
#include <NovGrdCore.h>
... and...
NovGrdCore NGC;
... in your program. (But you do have to include them! Even if you are not going to use any of the things that the NGC object makes available to you.)
pinMode(inPUL,INPUT_PULLUP);
pinMode(inPLL,INPUT_PULLUP);

pinMode(ouPUL,OUTPUT);
pinMode(ouPUR,OUTPUT);
pinMode(ouPLL,OUTPUT);
pinMode(ouPLR,OUTPUT);
Yes... I know: we have not done pinMode statements for two of the pins. Their default states are satisfactory.
(A digression on the name NGC: You don't have to use that name. But it will make following various examples easier, if you do. Can anyone see any objection to "standardizing" on "NGC"? PLEASE WRITE... soon... if you do!!)
When you...
#include <NovGrdCore.h>;
...and do the...
NovGrdCore NGC;
...you get access to the following. All but the first can be done other ways, which I will explain. (And the first only supplies a want which doesn't arise if you aren't using the library!)
If you call this, the version ID of the library will be sent to the serial monitor. You need to have executed a Serial.begin(9600) before you call reportVers().
If you execute makeOuUL(0), you will make the output driving the LED at the -U-pper-L-eft corner of the board low. Execute makeOuUL(1) and you make the output high. (In fact, any non-zero value for bState will make the output high.)
makeOuUL is complemented by makeOuUR, makeOuLL and makeOuLR, each of which allows you to make a different output high or low. On a NoviceGuard board with the default (minimum) components, and with links in the default settings, making an output high will turn an LED on.
There's another way to change the state of an output: You cal call makeOU(a,b). The first parameter determines which of the four outputs will be made high or low. The second parameter determines which state the output will be made.
boInHigh is a function which returns a boolean. You put 0, 1, 2 or 3 in as the parameter, and boInHigh will tell you, respectively, if the UpperLeft, UR, LL or LR input is currently high. In a basic NoviceGuard, the input will be high only if the button (switch) is not pressed.
The following is all you need in the loop of a program to test a basic NoviceGuard's four switches, four LEDs...
if (NGC.boInHigh(0)) {NGC.makeOu(0,0);} else {NGC.makeOu(0,1);};
if (NGC.boInHigh(1)) {NGC.makeOu(1,0);} else {NGC.makeOu(1,1);};
if (NGC.boInHigh(2)) {NGC.makeOu(2,0);} else {NGC.makeOu(2,1);};
if (NGC.boInHigh(3)) {NGC.makeOu(3,0);} else {NGC.makeOu(3,1);};
That's all the more remarkable when you remember that half of the inputs are connected to digital inputs, half to analog inputs... not a "fine point" I would trouble novices who are just getting started! But one they can learn about when they are ready, using NoviceGuard.
Digression Ends.... returning to Library Summary ---
These are the constructor and destructor code for the NovGrdCore class object. The destructor does nothing, but it exists, as an empty shell, in case a use arises.
The constructor does the pinMode statements that are essential for the proper operation of a NoviceGuard. Those pinMode statements can, of course, be done by hand... but why trouble your novices? Using the library, and seeing that the constructor is executed means your learners never even see a pinMode command, and thus may be less tempted to fiddle with one. (Details elsewhere.)
Use this link to download the NovGrdCore files. That will give you an ordinary .zip file. All of the files in it are just text files, but some of them have unusual extensions for a zip file, so that the Arduino programming environment knows what to do with them.
If you are totally new to libraries, installing them, etc, I have a page about libraries for Arduino work. But you probably don't really need it.
The page just mentioned explains that you can (I think) put libraries in your Arduino sketches folder. That approach may have certain charms, but for NovGrdCore, it would be best to put it in your "proper" Arduino Libraries folder.
Apologies, by the way, for explaining all of this in Windows terms. I would be delighted to create a small page with the equivalent instructions for Mac or Linux users, or create a link to such a page, if you would like to send me the information for creating it.
On my Windows XP machine, the right place was....
C:\Program Files\Arduino\libraries\
If you have trouble finding "the right place" either consult some of the general resources about installing libraries, or get in touch. (Contact details at bottom of page.) Tell me what operating system you are using.
Once you have determined the right place for the new library's folder, you just....
(*What is "Unpack"? You use Windows Explorer to navigate to the folder your .zip file is in. Double- click on it and a Windows Explorer window will open with the files in the zip listed. Open a separate Windows Explorer window. Navigate to the Arduino libraries folder. (You should see folders for the "standard" libraries, e.g. EEPROM, Ethernet, SoftwareSerial). If you haven't already done so, make the folder NovGrdCore I mentioned a moment ago. Drag and drop from the list of what's in the .zip to the folder made for the contents of the .zip.)
(If you examined the files, you will have seen from the rems that I am not an experienced writer of Arduino libraries... but that's good! (The library is simple, straightforward.) I would just mention, to reassure you, that I have done libraries for other environments before writing NovGrdCore. Also, the guides to library writing cited in the files are particularly good, and I just followed them.)
If ever you have a question relating to what the library does, what is in it, etc, etc, just go to the NovGrdCore.h and NovGrdCore.ccp files. Use a text editor to open them. See what you see. THAT is what the library has/ does! Web pages documenting something like a library do sometimes fall behind what is actually happening in the library.
Here is a snipped listing of what is in each of them at 28 Apr 15. Note the version ID embedded in the library. ("#define versNovGrdCore...") I won't promise that the .zip you download today will be the same as this, but I do not anticipate any "improvements"(!) which will change what the library currently does. I do hope to add... judiciously... to it in the future. In particular, the whole subject of the 12 way connector on the bottom edge of the NoviceGuard needs development at the moment.
I said the files were snipped... by all means consult the originals, if you want every detail.
  #include <Arduino.h>
     //Note that if you are using an old Arduino (before 1.0 IDE)
     //    change "Arduino.h" to "WProgram.h"

  class NovGrdCore
  {
     #define versNovGrdCore "0.001" //no ; here;

     #define inPUL 2 //no ; here
     #define inPUR 3 //no ; here ANALOG channel number
     #define inPLL 3 //no ; here
     #define inPLR 2 //no ; here ANALOG channel number

     #define ouPUL 4 //no ; here
     #define ouPUR 13 //no ; here
     #define ouPLL 5 //no ; here
     #define ouPLR 12 //no ; here

  public:
        NovGrdCore();//Constructor
        ~NovGrdCore();//Destructor
        void reportVers();
        void makeOuUL(byte bState);
        void makeOuUR(byte bState);
        void makeOuLR(byte bState);
        void makeOuLL(byte bState);
        void makeOu(byte bWhich,byte bState);
        boolean boInHigh(byte bWhich);
  private:
        int iTmp;
    };
/*For information on writing libraries...
First... good place to start...
   http://playground.arduino.cc/code/library

And then second, to confirm various, learn more...
   http://www.arduino.cc/en/Hacking/LibraryTutorial
*/

#include "NovGrdCore.h" //no ; here.

//<<constructor>>
NovGrdCore::NovGrdCore(){
	   pinMode(inPUL,INPUT_PULLUP); //make that pin an INPUT, with pull up
       pinMode(inPLL,INPUT_PULLUP);
       //The pins for inPUR. inPLR are ANALOG channels and the values
       //in those constants are the ANALOG CHANNEL NUMBER...
       //So it is all rather handy that the pins' modes are
       //  already as we want them,

       pinMode(ouPUL,OUTPUT); //make that pin an OUTPUT
       pinMode(ouPUR,OUTPUT);
       pinMode(ouPLL,OUTPUT);
       pinMode(ouPLR,OUTPUT);
    }

//<<destructor>>
NovGrdCore::~NovGrdCore(){/*nothing to destruct*/}

void NovGrdCore::reportVers()
//One call of Serial.begin(9600) is needed at some point before first use
//of reportVers()
{
iTmp=0;//An iTmp created in the .h file.
while (versNovGrdCore[iTmp]!=0){
   Serial.print(versNovGrdCore[iTmp]);
   iTmp++;
   delay(20);
}//end of while
}//end of reportVers

//Make UL output high or low (if bState 0 or not, respectively.)
void NovGrdCore::makeOuUL(byte bState)
{
  if (bState==0)
     {makeOu(0,0);}//no ; here
    else
     {makeOu(0,1);};
}//end of makeOuUL()

void NovGrdCore::makeOuUR(byte bState)
{
  if (bState==0)
     {makeOu(1,0);}//no ; here
    else
     {makeOu(1,1);};
}//end of makeOuUL()


void NovGrdCore::makeOuLL(byte bState)
{
  if (bState==0)
     {makeOu(2,0);}//no ; here
    else
     {makeOu(2,1);};
}//end of makeOuUL()


void NovGrdCore::makeOuLR(byte bState)
{
  if (bState==0)
     {makeOu(3,0);}//no ; here
    else
     {makeOu(3,1);};
}//end of makeOuUL()


void NovGrdCore::makeOu(byte bWhich,byte bState)
{
switch (bWhich) {
case 0:if (bState==0)
        {digitalWrite(ouPUL, LOW);}//no ; here
       else
        {digitalWrite(ouPUL, HIGH);};
//end of else
       break;
       //end of Case 0

case 1:if (bState==0)
        {digitalWrite(ouPUR, LOW);}//no ; here
       else
        {digitalWrite(ouPUR, HIGH);};//end of else
       break;
       //end of Case 1

case 2:if (bState==0)
        {digitalWrite(ouPLL, LOW);}//no ; here
       else
        {digitalWrite(ouPLL, HIGH);};//end of else
       break;
       //end of Case 2

case 3:if (bState==0)
        {digitalWrite(ouPLR, LOW);}//no ; here
       else
        {digitalWrite(ouPLR, HIGH);};//end of else
       break;
       //end of Case 3
  }//end of switch
}//end of makeOu()


boolean NovGrdCore::boInHigh(byte bWhich)
/*Cases 0 and 2 for digital inputs, pulled high
    until button pressed, which pulls them low.
  Cases 1 and 3 for analog inputs, pulled high
    until button pressed, which pulls them low.
  The case numbers chosen for NoviceGuard's
    layout, numbering the inputs in the order
    that printed words would be read.*/

{
switch (bWhich) {
//YES: presented 0,2,1,3... not 0,1,2,3
case 0:if (digitalRead(inPUL)==HIGH)
         {return true;}
        else
         {return false;}//end of else
       break;
       //end of Case 0
case 2:if (digitalRead(inPLL)==HIGH)
         {return true;}
        else
         {return false;}//end of else
       break;
       //end of Case 2

case 1:if (analogRead(inPUR)>127)
       //A low value in case driving LED
       //is depressing Vin. One of 2 instances
         {return true;}
        else
         {return false;}//end of else
       break;
       //end of Case 1

case 3:if (analogRead(inPLR)>127)
       //A low value in case driving LED
       //is depressing Vin Two of 2 instances
         {return true;}
        else
         {return false;}//end of else
       break;
       //end of Case 3

}//end of switch
}//end of boInHigh()
12w... TBD... reserved...
I hope that helped you understand what NovGrdCore has to offer? Click here for the main page for NoviceGuard if you haven't already seen it (or if, as I hope, you want to go back to it!)
I have many other ideas and resources for you over on my main page, SheepdogSoftware.co.uk.
![]() Page has been tested for compliance with INDUSTRY (not MS-only) standards, using the free, publicly accessible validator at validator.w3.org. Mostly passes, just a few "No attribute" issues, arising from Google code.
Page has been tested for compliance with INDUSTRY (not MS-only) standards, using the free, publicly accessible validator at validator.w3.org. Mostly passes, just a few "No attribute" issues, arising from Google code.
....... P a g e . . . E n d s .....