Click this for NoviceGuard main page
If you haven't "met" NoviceGuard yet.... start with the introduction?. That will open in a new tab or window... just close it to come back to here.
This page covers some general issues of where voltages which are present on the NoviceGuard board come from. It gets, a little bit, into issues of power demand. It describes circuits and some theory.
You probably need to read it, if you are going to use a NoviceGuard. However, there is also a series of three pages which address NoviceGuard "Power Demand Scenarios", e.g. NGPwrDemand_0, and set up some defined configurations. These have been created for the convenience of people writing about Things To Do With A NoviceGuard. If, for instance, you say, "This challenge only needs a NoviceGuard set up for NG_PwrDemand_0", then you know it can be done with a "simple" NoviceGuard... no daughter boards, no auxiliary power source.
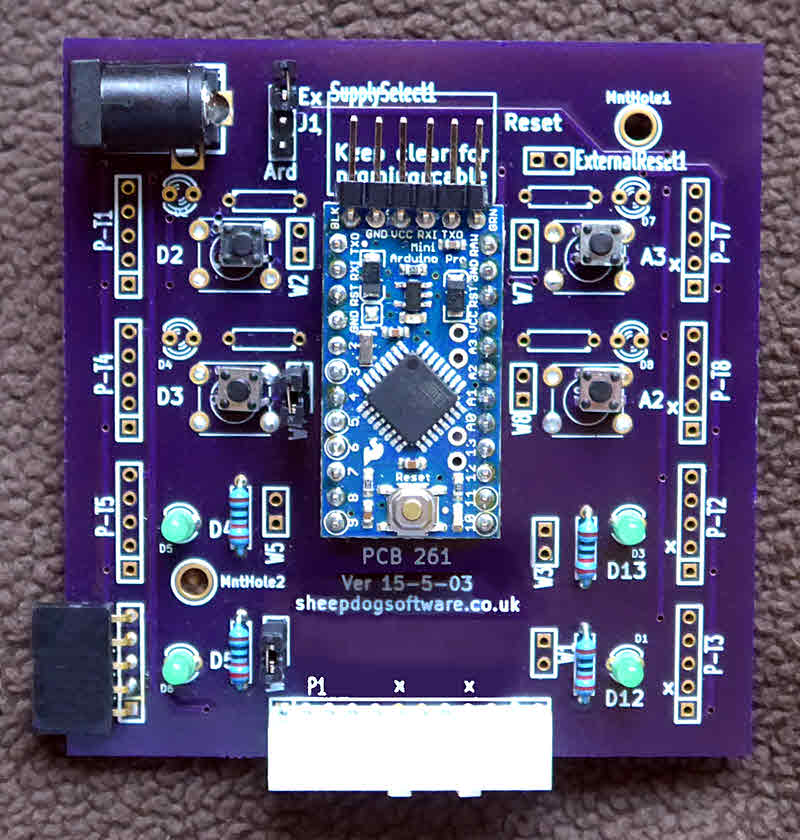
The basic NoviceGuard board comes with thin traces... or no traces... across the relevant configuration jumpers and sockets so that you can use it "as is", with four buttons on inputs and four LEDs on outputs. (You do have to provide two pull up resistors... explained elsewhere if you want to use inPUR and inPLR. (It's easy.))
Just provide the pull up resistors (or not), plug an Arduino Pro Mini into the NoviceGuard, plug a programming cable into the Arduino, and away you go.
You should not try to use the LEDs on the inputs at this point. (They are never for turning on and off with the Arduino; they are only there to tell you the level of the input being presented to the Arduino.)
A lot can be done with such a "trivial" configuration.
But eventually, I hope!, your users will want to do more.
If you are very careful, some daughter boards can be plugged into the sockets provided, without "getting clever" about the power supplied to the whole system. But I wouldn't delay the "getting clever".
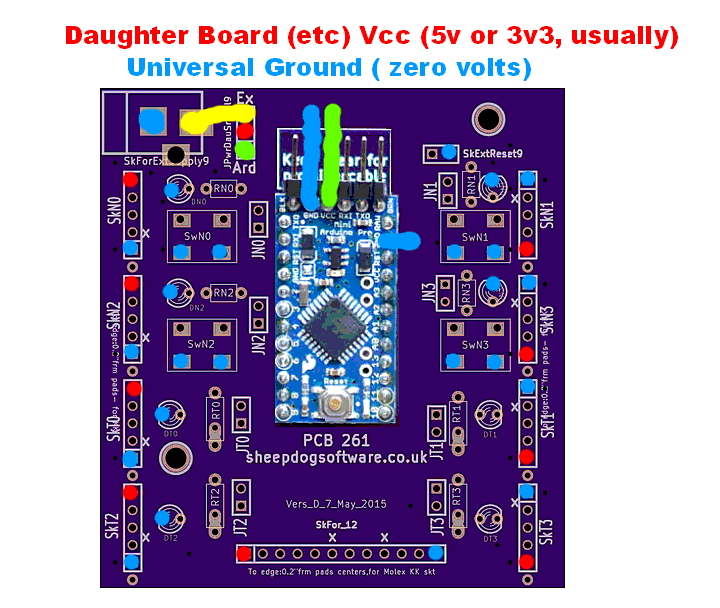
The first element of the design to master is the jumper set at JPwrDauSrcSel9. (It can be seen in the image, at the upper left, peeking out from under the horizontal yellow splodge.)
There are three pins to the jumper. You put one of the common little "hats" on the top two pins or the bottom two.
The main point of the jumper is to decide where the power for the daughter boards comes from. The central pin of JPwrDauSrcSel9 connects directly to pin 5 of all the daughter board sockets, and pin zero of the twelve way connector. (Please reserve the term "daughter board" for thinks plugged into one of the 5 way connectors. Things plugged into the twelve way connector should be called something else, e.g. "twelve way connector plug-in".)
By means of the "hat" on two pins at JPwrDauSrcSel9, you can supply to the daughter boards either from the Arduino... ultimately from the "programming" (and power) cable. This is the option that will be accomplished by the thin trace between the center and bottom pins of JPwrDauSrcSel9. The Vcc comes in from the "big" computer at the other end of the programming cable over the pin marked in green. You'll see that I've also marked the bottom pin of JPwrDauSrcSel9 green, to confirm the relationship, the connection.
If you decide to provide pins at JPwrDauSrcSel9, be careful to SEVER the thin trace between the middle and bottom pins of JPwrDauSrcSel9, which provides the default power distribution until pins are installed.
Once you have severed the default-establishing trace, you can put the JPwrDauSrcSel9 "hat" on the TOP pin and middle pin. If you are going to do this, you also need to supply via skForExtSupply9. The footprint will accommodate a barrel jack, or you can solder wires to the pads. Vcc on the pad marked with yellow, ground to the pad marked in blue.
I hope that your barrel jack will be the same as the barrel jack I was looking at when I designed the board. Even if the barrel jack you have came from me, be sure that it (and your PSU's cable) combine to put Vcc on the yellow pad, ground on the blue one. NoviceGuard doesn't connect to the third pad in the footprint. All of the barrel jacks I've ever seen have the positive voltage on the pin... but do check your PSU's cable. Assumptions make an ass out of me and u.
Nota bene: Vcc is supplied on the top pin on the left hand sockets, the bottom pin on the right hand sockets. This seeming "trap" is necessary if you want every daughter board to be useable on either side of the NoviceGuard, not restricted to one side or the other. Don't assume that the top pin on the left hand daughter boards carries the same signal as the top pin on the right hand daughter boards. A different logic is in action.
For now, leave the pads at SkExtToArd_CARE9 unconnected. That, with care, when no programming cable is present, and JPwrDauSrcSel9 is connecting the top ("Ex") pin to its middle pin, and there's power available from SkForExtSupply9 that the whole system... Arduino and circuits on and plugged into NoviceGuard... will run happily from the external power supply.
You would want to use this configuration with an Arduino programmed to Do Something, something not needing the serial monitor, and now in a usable state. In other words, the programming (and re-programming!) has got to the point that the connection to the "big" computer is no longer needed for anything other than power. Even a cheap "big" PC is an expensive PSU!
This idea has not (22 May 15) had serious testing. If you've read the other material on SkExtToArd_CARE9, and are "an expert", and have studied the schematic, thought deeply, and are willing to be responsible, try connecting the pads of SkExtToArd_CARE9.... and let me know how well things go? (^_^)
![]() Page has been tested for compliance with INDUSTRY (not MS-only) standards, using the free, publicly accessible validator at validator.w3.org. Mostly passes, just a few "No attribute" issues, arising from Google code.
Page has been tested for compliance with INDUSTRY (not MS-only) standards, using the free, publicly accessible validator at validator.w3.org. Mostly passes, just a few "No attribute" issues, arising from Google code.
....... P a g e . . . E n d s .....