Click this for NoviceGuard main page
This page is a sub-page of my Rugguino site, and a sub-page of the information for NoviceGuard (PCB 261). For more an introduction to NoviceGuard, please see the NoviceGuard main page.
Suggestion: This page is "browser friendly". Make your browser window as wide as you want it. The text will flow nicely for you. It is easier to read in a narrow window. With most browsers, pressing plus, minus or zero while the control key (ctrl) is held down will change the text's size. (Enlarge, reduce, restore to default, respectively.) (This is more fully explained and there's another tip at my Power Browsing page.)
This page is about challenges to put in front of Arduino novices, to "get them going" with Arduino programming.
If you've been to this page before, and don't need the "scene" to be "set" for you, you can jump down to where the challenges begin. But don't whine if it doesn't make sense, if you've never read the scene setting stuff.
You don't need a NoviceGuard to use the ideas on this page... but the challenges can more easily be accomplished on an Arduino with a NoviceGuard. At the moment, "model answers" are scarce. I will try to supply some in due course.
The page will grow if interest in the NoviceGuard grows, and as time permits, even if it doesn't.
This page is partly "up to you". Light a candle. Or do you concur that Arduinos are only for a few geeks, beyond the ability of schools, youth programs, summer camps, parents? (Of course, given the culture in many schools, I might agree with you on the first one. So when are parents going to step in, and provide for their children what the taxpayer-funded day care centers don't provide? Ooo! Political. Going off in a huff? Don't worry, the tax dollars will still flow.)
Don't like reading? Want pictures, and lots of white space? Then, in its present state, this page probably isn't for you. Don't confuse that with the idea that NoviceGuard isn't for you. (You don't need what is on this page to use NoviceGuard.)
Please Facebook "Like", forward, mention in blogs, etc. if you think the NoviceGuard could help bring beginners into the marvelous world of microprocessor "play".
I am looking for teachers or electronics savvy parents, youth group leaders, etc, actually working with kids with Arduinos in schools (or homes) for comments and further testing. I will loan you a NoviceGuard, if you will do something with it! (Email link given elsewhere.) (I don't mean to exclude others from the list of people I might loan a NoviceGuard to. Just write, explain, ask, if you think you should get to play with one.)
There is a page dedicated to how to obtain NoviceGuards.
I would be very grateful for ideas to add to this page. They don't have to be "rocket science". I'm looking for challenges to stimulate beginners. Your idea will have the best chance of appearing here if you present it in a "web page ready" form. Please don't bother to provide the HTML tags for your item, but please do write your text in a style suitable for just being copy/pasted into this page.
Why should you bother? Because you are a nice person, who wants to help inspire tired teachers, parents, with fun ideas for their learners... and because I will... within reason... connect your contribution with a little plug for whatever you want promoted, especially if it is relevant to Arduino use or education.
My heart isn't really in this NoviceGuard page. Had you guessed? Besides writing this, there is all the rest to do, including a "course" on Arduino programming, which is easier with a NoviceGuard, but can be followed without one. And a "manual" for NoviceGuard.
If you just want a play package, with dozens of prepared handouts to keep the kids busy, you've been reading in the wrong place. This isn't really for you. If you can't think what you'd do with kids and Arduinos, this isn't for you. If you do have some idea of what you'd do with kids and Arduinos, but were afraid they'd be overwhelmed by the "fiddly bits" of hooking things up, knowing enough electronics at the beginning, damaging the Arduinos, then it is for you that I've done all I have to make NoviceGuard a reality. If you have neat ideas to share, they are welcome... but, I think you'll agree, if you are "Right Thinking", unnecessary.
At the risk of being slightly ahead of myself, I will put the following in here. Fear not, it is repeated down at the bottom of the page, for your convenience, if that instance is easier to find when you want it.
You don't need a NoviceGuard to contribute to this site, or to use the ideas that I hope will "grow" on it.
But it will be helpful if you subscribe to some "common ground", which I will explain shortly.
You do not have to test or present answers to the challenges you propose. (Although I would ask you to be sure in your own mind that their goals are achievable!) Perhaps one day, NoviceGuard will have developed so far that we build libraries of challenges and sample solutions. I suspect that the "answers" to suitable challenges will be self evident to the audience of this site.
If you don't have a NoviceGuard, and want to write a "solution" to a NoviceGuard challenge, your work will be most valuable (to the NoviceGuard community, anyway!) if it could run on a NoviceGuard simplified/ protected Arduino. So here's what you need to know. (The material is presented in more detail on the "You don't need a NoviceGuard board" page.)
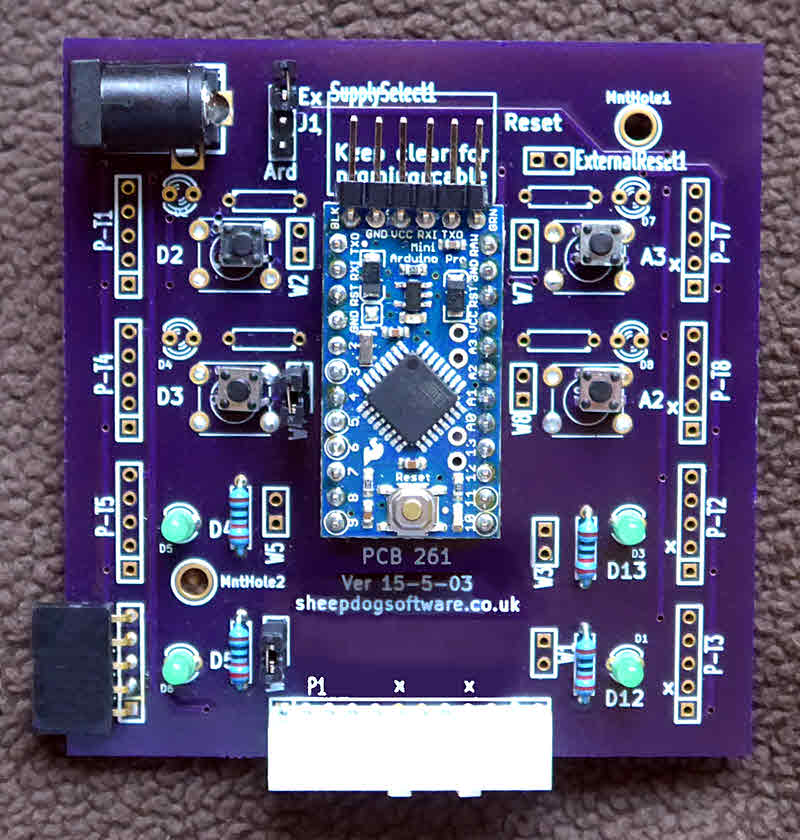
At "NG_PwrDemand_0", where beginners start their Arduino adventures, there are four buttons like doorbell buttons, i.e. momentary SPST switches. And there are four LEDs the Arduino can turn on or off. The buttons are in a rectangle on the top half of the board; the LEDs in a rectangle at the bottom of the board.
To keep us all "on the same page", I will ask that everyone refer to these as...
buUL, buUR, buLL, and buLR for the buttons
ledUL, ledUR, ledLL, and ledLR for the LEDs.
.... "UL": Upper left. "LR": Lower right. Etc.
And the pins they are attached to...
ouPUL, ouPUR, ouPLL, and ouPLR for the LEDs.
inPUL, inPUR, inPLL, and inPLR for the inputs. (See note A).
Note A: buUL and buUR should be on ordinary digital inputs, ideally pins 2 and 3. No pull up resistors needed, as buUL and buLL are initialized with pinMode(x,INPUT_PULLUP) commands.
However: buUR and buLR should be on analog inputs, and they need to be pulled up with 10k resistors. In boInputHigh() (supplied by the free Arduino library NovGrdCore, or otherwise), this underlying technical issue is hidden from the novice novices, but the design of the board makes it possible for users to access the analog inputs as analog inputs... but only when they are ready for that new opportunity.
Just as you don't need a NoviceGuard board, neither do you need the (free) NovGrdCore Arduino library. But your ideas are more likely to be accepted for this page if any solutions you present to challenges you devise are presented in NovGrdCore-friendly terms. (I really do commend the library to you. It is not complex, can be investigated before you install it, is all around A Good Idea!)
In this configuration, you just have 4 "doorbell" type buttons, and four LEDs to "play" with. (See the Power Demand Scenarios page for greater detail.)
The basic "Blinky" program can, of course, be run. As can many of the other standard "getting started" exercises.
I hope teachers ("professional" and informal) will not only be helping users to "get it to work", but also steering them towards GOOD programming.
I mention that here, because just getting the Arduino to "do" many of the following is no big deal. But along the way to getting that far, I hope the learners will get guidance in the other matters.
I've split the NG_PwrDemand_0 NoviceGuard configuration accessible challenges into two groups... challenges which need the Arduino serial monitor, and those that do not, starting (obviously?) with the ones that only need the NoviceGuard, and not the serial monitor.
Actually, if you need a list of "things you could inspire beginners to do" with a NG_PwrDemand_0 NoviceGuard, I probably can't help you anyway, so I won't say a lot more here. If someone writes in with something "special", or novel and fun, I would be glad to include it here, with credit to the creator, of course. But... despite having said that....
Reaction timer: Set up an Arduino to sit quietly for a time, no LEDs lit. Then one LED comes on. User's job is to push corresponding button. (Upper left button, if upper left LED came on, etc). Arduino then "reports" a "score", using just the standard four LEDs. How does it report a score? Answering that is a good challenge in itself! It could be as simple as lighting 1, 2, 3 or all four of the LEDs. Or one LED could wink "x" times to report a score of "x". (This of course should be a "starter question" which would lead on to doing the same thing, but with the time taken output via the serial monitor. Illustrating, along the way, starting a program "small", and building it up... along a planned development route.)
Quiz or survey program: Make the Arduino put a question on the serial monitor. Give four possible answers. Wait for user to press one of the Arduino buttons. Go on to next question.
Many variations are possible. With a quiz program, the answer should be "marked", right or wrong. If wrong, the right answer should be displayed. At the end, a score should be reported. If a survey, the program should accept sets of responses. As users progress through the survey, they might (after their own response is given) be told what choices previous participants in the survey gave.
Reaction Timer, revisited: As will be true for MANY of the challenges, when the learner has more hardware to use, the quality of his/ her solution to an earlier challenge can be raised, by use of the extra hardware. The same program as was created for the "NG_PwrDemand_0, no serial monitor" challenge (above) could be used, but now scores could be reported on the serial monitor. The "score", with this better output device available, would probably just be how quickly the user responded to the LED, and their score of "too soon"s, "wrong button"s, etc, displayed.
-------
Do you begin to get the idea? There really is NO END to the challenges you can undertake on an Arduino. Doing it on an NoviceGuard- protected Arduino means that less time is wasted "fussing" with connections, etc.
If writing up challenges "with answers" outside of the NoviceGuard world, please use "buUL", "ouPLR", boInputHigh(), etc., to remain "NoviceGuard/ NovGrdCore friendly". And, for the same reason, arrange your inputs in a square, outputs in a squared.
"NG_PwrDemand_1" configuration means that your beginners are allowed to plug in simple daughter boards. Not "any old" daughter boards. Just daughter boards provided by you. (And only daughter boards for the 5 way sockets, not for the "fancy one" (12 way) on the bottom edge of NoviceGuard, which, please, should not be called a "daughter board". (Call it a "12W connector module" or somesuch.)
This configuration is still quite limited, but it does allow learners a chance to start investigating analog inputs. (I would start them with a simple potentiometer.) It also opens up interacting with other devices via a serial signal. (The link takes you to a page about using a PC's serial port. That page comes from long before Arduinos existed... but most of what appears there applies equally to the Arduino world... and, of course, you might want to talk to a "big" computer (e.g. Windows/ Mac/ Linux) with your Arduino, so might need the serial-with-bit-PC information anyway!)
Serial comms is hardly a novice-friendly topic, but it can be made one, if you so wish. And there are not desperately expensive (under $30) "black boxes" you could connect under NG_PwrDemand_1 which would give the user access to an ordinary QWERTY keyboard, and a VGA (text only, but with windows) display. Again... if you wish. Not needed.
There are some other things you can under NG_PwrDemand_1 conditions besides serial I/O, but by the time your users are ready for NG_PwrDemand_1, they are nearly ready for NG_PwrDemand_2, too. (By the way: anything that can be done under configuration, say, NG_PwrDemand_1, will work fine under "higher" configurations, too, say NG_PwrDemand_3. Any "lower level" thing can be done on a board set up for a higher level.)
NG_PwrDemand_1 is attractive because no secondary power supply is needed. NG_PwrDemand_2 brings in that minor hassle.
NG_PwrDemand_1 daughter boards are defined by the fact that they make very little use, if any, of the Vcc available on a connector of the daughter board sockets. (The top pin on the left hand sockets, the bottom pin on the right hand sockets. This seeming "trap" is necessary if you want every daughter board to be useable on either side of the NoviceGuard, not restricted to one side or the other.)
Depending on the daughter boards you make available, this may be the time to start educating your users about the limits of the power which can safely pass through the Arduino.
If writing up challenges "with answers" outside of the NoviceGuard world, please use "buUL", "ouPLR", boInputHigh(), etc., to remain "NoviceGuard/ NovGrdCore friendly". And, for the same reason, arrange your inputs in a square and you outputs in a second square.
In setting forth a Level One challenges the educator will need to describe the daughter board needed for that challenge.
Toggle switches: Not so much a "challenge" as an opportunity: You can connect a toggle switch to an input... it will need a 10k pull-up to work on the analog inputs, and the 10k pull up won't affect the operation on the digital input side, so just include it. It won't do anything that the momentary switch on-board the basic NoviceGuard won't do... but it will "work" better for some projects. For example, you can simulate a simple burglar alarm system under the NG_PwrDemand_0 scenario, but requiring the user to hold down the "tell alarm system to watch house" button is rather unrealistic, isn't it?!
rDemand_1 opens up a huge range of possibilities which stem from the fact that now you can connect a potentiometer... or equivalent... to the Arduino, and start using analogRead(inPUR) and analogRead(inPLR).A good "first potentiometer challenge" is to re-write "Blinky" so that the frequency changes when you change the setting on the potentiometer.
You can of course connect many, many sensors which produce analog output to those two locations. Most of which require a supply voltage. If they allow much current to flow, they will have to be used under the NG_PwrDemand_2 scenario, but many do not (allow a big current) and are fine with the NG_PwrDemand_1 scenario.
Environmental monitoring: Besides things that need sensors giving an analog output, if you can put it on a switch, you can monitor it with a NoviceGuard in the "NG_PwrDemand_1" configuration. The list of things you can put on a switch is as long as your imagination.
Burglar alarms and "don't look in my desk" alarms are popular. In a similar vein, very, very early in the days of my computer teaching... I'd used them for years... I was in a classroom next to an outside door which wasn't on a closer, and which the children endlessly left open. With a BBC Micro I set up a program to display (It had a screen... something you can give a NG_PwrDemand_1 NoviceGuard.. about $25 plus non-permanent use of a spare VGA monitor) bar charts of how often the door was open for different periods. (I was trying to persuade "the authorities" of the need for a closer on the door. I never imagined the kids would begin closing it!). But, of course, I showed the kids what the computer was doing. One of them went on to be one of the principles at AmVisualisation.com... where virtual images of buildings which will one day exist are created. One such virtual building allowed the developer to sell two units at several million... each... before the building was built. Another pupil of the time not so long ago was in charge of replacing all of the displays around the tops of the walls at the Chicago mercantile exchange. And I was supposed to be teaching them science. But a few "computer lessons" snuck in under the radar. And they could see a computer doing something.
Whew! Back to switches!
Someone had fun monitoring the activity of their hamster by using a "switch" on his exercise wheel.
You can monitor fridge door openings, if someone is trying to loose weight. Wind speed. Rainfall.
Weather Station: Connect a temperature sensor (about $3), and monitor the environment. Simulate a heating control system: Turn on an LED to "stand for" turning on a house's heat. (If you can turn on an LED, you can fire a rocket... you just hook the output up to different external electronics). You could combine temperature monitoring with wind speed and rainfall monitors. Sadly, an SD memory card is probably beyond the reach of a NoviceGuard (and/or a novice!)... but the collected data could be sent to the serial monitor. Highs and lows for the past 24 hours, week, etc, could be on a VGA display...
Displays with digits: People used to programming computers with VGA displays and GUIs sometimes take a while to warm to a device which has four LEDs to handle "output".
Arduinos, NoviceGuard enhanced or "naked", can "do" fancier displays. It is only a question of the hassle and/ or expense you want to undertake.
You can drive a VGA 50 line, 100 characters per line display with a single output line, under scenario NG_PwrDemand_1. (About $45, plus a VGA display, of course. Something secondhand, or borrowed from some other duty would do.)
You can buy small, cheap ($15) modules with 4 seven segment LED digits, again controlled by a single output, so, again, scenario NG_PwrDemand_1 friendly. Alternatively, for approximate "numbers", it is easy to drive a small digital voltmeter with a pulsed output line feeding a capacitor to smooth the voltage to a range of steady values. This would be fine for, say, a "volume" readout... but less than perfect for, say, an Arduino thermometer.
Beeper Output DevicesThink carefully before you inflict the following on yourself, but giving users a daughter board with a little piezo sounder on it will open up a bunch of stuff they actually can do just as well with an LED... but they will probably enjoy it more if it makes a racket. Sigh.
I would "go for" the sort of sounder with a built in oscillator. Remember that within the NoviceGuard world, users aren't supposed to "mess with" the pinMode statements. Can you do PWM signals in that environment? (I don't know, and can't be bothered to research) Would you want to, with novices, anyway? So, self oscillating makes more sense than one you have to "drive" by hand. Of course, if you want to focus on "What is sound?" along the way, a "simple" piezo element opens all sorts of possibilities! (But be careful that your beeper draws less than 11mA, won't you? For more power-hungry beepers, you need to go to NG_PwrDemand_2, and use a transistor to switch the beeper on and off. Not rocket science, and your users don't need to know the details.)
Perpetual Motion Machine: Perhaps more than you'd want to attempt in one lesson with ten year olds, but as an example of how much a NoviceGuard enhanced Arduino can do, my Perpetual Pendulum could be set up, with no demands beyond those met by the NG_PwrDemand_1 NoviceGuard configuration.
Optoisolators: You can use opto-isolators via daughter boards... to isolate inputs or outputs. They are particularly useful for voltage level shifting. You won't need a voltage on the NoviceGuard side if using an optoisolator (aka optocoupler) on an input, but you will need "outside" voltages on the other side of the opto coupler, and this "complication" didn't seem suitable for novice NoviceGuard users. (Otherwise it would have suited scenario NG_PwrDemand_1). Note that if optoisolators are involved, you will probably want isolated GROUND circuits... an unusual circumstance. (Many of the problems users have can be traced to not understanding that usually it is right to interconnect grounds.)
Etc, etc: There are many other things you could do with Level One capabilities and devices.
If writing up challenges "with answers" outside of the NoviceGuard world, please use "buUL", "ouPLR", boInputHigh(), etc., to remain "NoviceGuard/ NovGrdCore friendly". And, for the same reason, arrange your inputs in a square, and your outputs in a second square.
Your beginners really don't need much hardware to do a lot of Arduino programming. Especially if you use the serial monitor a lot.
But for there to be some point to your beginners learning to program a microprocessor, you really "need" to supply them with hardware for the microprocessor to interact with.
(Consider teaching them something like Lazarus, if hardware is Just Too Much Hassle (or expense). Please don't aid and abet Microsoft's attempt to cling to hegemony by teaching their "free" ('til you're hooked) packages.)
Hopefully, you will have many copies of inexpensive daughter boards, but, where the external devices are expensive, you might have....
One daughter board available with the cool "smart LEDs" (WS2812s), and...
One daughter board with an RFID reader connected to it, and...
One with a matrix keypad, and...
One serial-to-VGA adapter, one USB-keyboard-to-serial adapter...
... etc, etc!
The lack of multiple copies of each expensive 12 way connector module (or daughter board) is no problem! An opportunity, really... Chance for learners to study "sharing". Chance for teacher to reward the hard-working, teach a bit about how in the real world some people get ahead, others don't. I would suggest that a part of the resource allocation procedure be that the learners who want to use a particular device have got to write up an explanation of what they want it for before they get use thereof. The pupil or team with the most deserving idea, best presented, and with a track record of Getting Things Done, gets the most wanted resource.
"NG_PwrDemand_2" configuration means that your beginners are allowed to plug in more advanced daughter boards. Not "any old" daughter boards.
NG_PwrDemand_2 also means that the daughter board power sockets are supplied from an external PSU. Just daughter boards provided by you. (And only daughter boards for the 5 way sockets, not for the "fancy one" (12 way) on the bottom edge of NoviceGuard... please don't call things for the 12 way connector "daughter boards". Reserve "daughter boards" for things for the 5 way connectors.)
NG_PwrDemand_2 boards are defined by the fact that they tap into the Vcc available from the daughter board socket, AND that the Vcc is being supplied from an external supply. You will need to extend your users' education about the limits what they can and cannot plug in. I don't mean that they need to become electrical engineers... each module could be marked with the power it uses.
Relays: Daughter boards with relays which have a coil voltage which is the same as Vcc are easy, with higher voltages possible, just a little harder, and needing a transistor. BE SURE to include The Diode. Another page discusses both the transistor and diode issues for relays.
Motors: Simple DC motors can be run from the NoviceGuard. BE CAREFUL: Some of the cheap ones can "inject" dangerous voltage spikes into the system. Research this area before getting too enthusiastic. Or isolate the motors... carefully. I "blew up" a bunch of microprocessors years ago without figuring out where my isolation was failing.
Stepper motors are more popular today, but they are probably best controlled via a 12 way connector module... see NG_PwrDemand_3.
H-Bridges, or programming to control two DPST relays to simulate one... are within the reach of NG_PwrDemand_2. In my home, a set of curtains have closed at dusk and opened after I go to bed "by themselves" for years... since maybe 1990?... with such circuits.
Shaft encoders: While in the case of the curtain closer just mentioned, a limit switch directly stops the motor when the curtain is fully open or closed, it would also be possible to solve the problem with a limit switch wired to the controlling silicon intelligence. But often you want to know more than "fully open" or "fully closed", and then you use a shaft encoder. Simple ones interface easily under NG_PwrDemand_2, or even _1... they were mentioned earlier. (Hamster wheel, wind speed.) More complex shaft encoders can be interfaced (two inputs needed), but I suspect projects needing a shaft encoder with direction sensing (the "complex" ones) will need lots of inputs and outputs, and hence be projects for scenario NG_PwrDemand3. But there is no reason that a complex shaft encoder couldn't be "met", its operation explored, under NG_PwrDemand_2 conditions. The most complex ones, which return the absolute amount of revolution, rather than just pulses for each bit of turning will certainly require the NG_PwrDemand_3 scenario. (Other than the potentiometer-based, analog output shaft encoders... but we "do digital"! So often so much better than analog.)
Infra-Red Input Devices: Your users would need a bit of help with "extra" odds and ends. (Or you could prepare the computers ahead of time... it is mainly a matter of a library, and how to use it.) (Apart from that, you might, depending on your sensor, be able to move this to the Level Two Challenges.)
The parts for the daughter board would cost very little... under $5. (TSOP1838) And an IR remote control would need to be available, but only "on loan" to the Arduino learning.
Given those conditions, the Arduino could be programmed to send messages to the standard serial monitor in response to "commands" from an ordinary IR remote control handset. For instance, when a user presses "1" on the remote control, "Someone pressed the "1" button" should appear on the serial monitor. Etc. It is all explained at my page about using IR controllers. (Just ignore anything there about "NuElectronics". They got me started with IR controls, but they seem to be dead. Nothing that mentions them is central to doing the things described.)
Etc, etc: There are many other things you could do with NG_PwrDemand_3 capabilities. (Various other things were "pre-announced" in the discussions of the more simple NG_PwrDemand scenarios, above, too, remember.)
If writing up challenges "with answers" outside of the NoviceGuard world, please use "buUL", "ouPLR", boInputHigh(), etc., to remain "NoviceGuard/ NovGrdCore friendly". And, for the same reason, arrange your inputs in a square, and your outputs in a second square.
"NG_PwrDemand_3" configuration means everything that is allowed in lower configurations (as is always true), and now you are giving your users permission to plug modules into the 12 way connector. (Please do not use the term "daughter boards) for these modules.)
For some of the more complex things below, you might need additional libraries. The matrix keypad example is a case where a third party library is available... or does it come as part of the basic package, these days? But you might want to challenge your learners to start by trying to write their own routines, and then move on to the library when they've gained an appreciation of how much the library is doing for them!
Matrix Keypads: A matrix keypad makes more complex input possible... and you "pay" for that with the need for more hardware (not expensive or power hungry) and "advanced" programming... or library use.
LCD displays: I know of a nice little LCD display, about $8 from China, which I'm pretty sure could be connected to a NoviceGuard equipped Arduino. It even gives you five input buttons, as a little bonus. NoviceGuard does not "stop you doing things". Well. Not many things.
Infra-Red Input Devices: Your users would need a bit of help with "extra" odds and ends. (Or you could prepare the computers ahead of time... it is mainly a matter of a library, and how to use it.) (Apart from that, you might, depending on your sensor, be able to move this to the Level Two Challenges.)
The parts for the daughter board would cost very little... under $5. (TSOP1838) And an IR remote control would need to be available, but only "on loan" to the Arduino learning.
Given those conditions, the Arduino could be programmed to send messages to the standard serial monitor in response to "commands" from an ordinary IR remote control handset. For instance, when a user presses "1" on the remote control, "Someone pressed the "1" button" should appear on the serial monitor. Etc. It is all explained at my page about using IR controllers. (Just ignore anything there about "NuElectronics". They got me started with IR controls, but they seem to be dead. Nothing that mentions them is central to doing the things described.)
Etc, etc: There are many other things you could do with Level Three capabilities.
If writing up challenges "with answers" outside of the NoviceGuard world, please use "buUL", "ouPLR", boInputHigh(), etc., to remain "NoviceGuard/ NovGrdCore friendly". And, for the same reason, arrange your inputs in a square, and your outputs in a square.
Just saying... although they don't seem to be of much interest, I have spent probably man years writing a wide range of Arduino "how to"s. There's even a full "course" of Arduino training, although most pages can be read in isolation. Almost anything in those pages can be done on a NoviceGuard- protected Arduino. If you would like advice as to which Level a given tutorial/ how to would be appropriate to, please send me the URL ("www- thingie") of the page in question.
So... that, I hope, gives you an idea of what NoviceGuard is about. It grieves me that kids are not being "got started" at school in the fabulous world of micro-electronics. Be part of the solution!
NoviceGuard needs to gather momentum. In search of that, I will loan a NoviceGuard to suitable individuals. Write, tell me why I should loan you one. If I cannot send it to you c/o a school I can research on the web, it will help if you are an established contributor at the Arduino Forum.
There is a page dedicated to how to obtain NoviceGuards.
This page is a sub-page of my Rugguino site, and a sub-page of the information for NoviceGuard (PCB 261). For more information please see the NoviceGuard main page.
![]() Page has been tested for compliance with INDUSTRY (not MS-only) standards, using the free, publicly accessible validator at validator.w3.org. Mostly passes, just a few "No attribute" issues, arising from Google code.
Page has been tested for compliance with INDUSTRY (not MS-only) standards, using the free, publicly accessible validator at validator.w3.org. Mostly passes, just a few "No attribute" issues, arising from Google code.
....... P a g e . . . E n d s .....